

HELLO EVERYONE!
MY NAME IS JENN WHITE.
NICE TO MEET YOU!
Thank you all for joining me today on the 100 Moons Creative Collab Blog.
For my first 100 Moons Creative Collaboration Team creations, I chose to experiment with a 2.2 pound brick package of Sculpey air dry clay & RubberMoon & 100 Proof Press rubber stamps.
I truly enjoy taking the rubber stamps in my collection a step further using them as clay impression moulds.
When rubber stamp shopping for this type of creation, I purposely choose UNMOUNTED OR TRIMMED ON CLING rubber stamps that are deeply etched for the best raised image effects.

My personal favorite stamps to use for this are rubber stamps that are near the exact same in size so I can quickly & easily create 2 sided ornaments. A sort of "sandwich" system I devised so there's reversable beauty on both sides! BONUS!
There are many many more RUBBERMOON, 100 PROOF PRESS & ARTFOAMIES STAMPS that are very compatible & the same in size than the ones I am sharing with you today in this particular tutorial.
☆PRO TIP☆
Pay attention to size measurements when shopping on 100proofpress.com rubbermoon.com & artfoamies.com you will find even more rubber stamps you will like to play & experiment with too! YAY!
The rubber stamps do not always necessarily have to be the exact same size though. I often impress the back with a background stamp, a word or phrase or I use letter & number stamps to impress the date, a persons name or their initials. Even the name of the special occasion or holiday.


https://rubbermoon.com/products/kae-pea-kp7279g-you-can-see-the-stars-rubber-art-stamp?_pos=1&_sid=d06012b22&_ss=r
These make lovely
heart felt handmade gifts & favors to commemorate holidays or other special occasions.
You could even make custom award medals for any awards ceremony or competition using this process.
I hope you will enjoy my tutorial & have as much fun creating these as I do.
Warning! You may become as addicted to rubber stamping into clay as I am.
Feel free to contact me in the comments below or by messenger if you have any comments or questions & I will try to get back to you as soon as I am able.
☆PRO TIP☆
BEFORE YOU BEGIN, PLEASE KNOW THE START TO FINISH PROCESS OF THIS TUTORIAL IS 3 to 4 DAYS (because of the drying times on the air dry clay, paints & inks.)
I did not want you to think you were going to be able to complete this tutorial in a few hours.
It is important to take your time & have patience for best results. Drying times are very important & worth the wait.
When I create these, I make them in mass quantities for custom gifts & to sell. I sometimes have to allow them to dry & cure for 48 hours.
I do have a dehumidifier that speeds the drying time a bit. I do not use fans, heat tools or heat guns on these.
☆STEP 1☆
GATHER YOUR SUPPLIES!
You will need:
☆A 2.2 pound brick package of very inexpensive Sculpey air dry clay. I usually grab one or two packages for around $6 each in the art supply section in the general merchandise store in my town when I am grocery shopping.
There are many other kinds & types of clay you can use on the market.
I used it because it is what I had on hand at home. I have also used Crayola Model Magic & AVes Apoxie Sculpt to make these.

☆PRO TIP☆
If you will be wearing you creation constantly & possibly getting your creation wet or going under water with it on or if it will be exposed to the elements in any outdoor garden or patio situation, I recommend using AVes Apoxie Sculpt 2 part clay to create your piece.
If it will be an ornament on display indoors the Sculpey air dry clay or the Crayola Model Magic will do just fine.
☆Something solid, sturdy & smooth to roll out the clay.
I used my wooden rolling pin.
You could also use a fondant rolling pin, a piece of PVC pipe or a clean smooth brayer.
☆A clean, smooth, level & dry surface.
I used the smooth laminate countertops in my kitchen. I have also used glass mats, silicone mats & waxed paper under these clays.
☆At least 2 UNMOUNTED or TRIMMED ON CLING rubber stamps. For this particular blog post I am using circular shaped rubber stamps that are the same size.
I found these at rubbermoon.com & 100proofpress.com
The RubberMoon rubber stamps I used are:

https://rubbermoon.com/collections/stamps-by-sandra-evertson/products/sandra-evertson-se7475l-fire-rubber-art-stamp

☆MANDALA Art Stamp- By Sandra Evertson - SE 6028H
https://rubbermoon.com/collections/stamps-by-sandra-evertson/products/mandala-se6028h-rubber-art-stamp
☆The 100 Proof Press rubber stamps I used are:

☆6121 - HUGE ZODIAC CHART
https://100proofpress.com/products/6121-huge-zodiac-chart?_pos=1&_sid=85907f592&_ss=r

☆5861 - SUN - MOON PHASE CIRCLE
https://100proofpress.com/products/5861-sun-moon-phase-circle?_pos=2&_sid=19a75e344&_ss=r
☆Permenant ink pen or marker to write on the back of your rubber stamps.
☆Ruler or tape measure to measure the clay thickness.
☆Water to dampen your fingers to smooth the edges of the clay medallion.
☆Clean & dry *RubberMoon Ink Piks.
https://rubbermoon.com/products/ink-piks-set-of-25?_pos=1&_sid=c37d80535&_ss=r
OR clean & dry detail paint brushes.
☆A vessel of water to clean the paint off of your paint brushes.
☆A pair of long shank scissors you do not care deeply about.
I used an old pair of worn out fabric scissors.
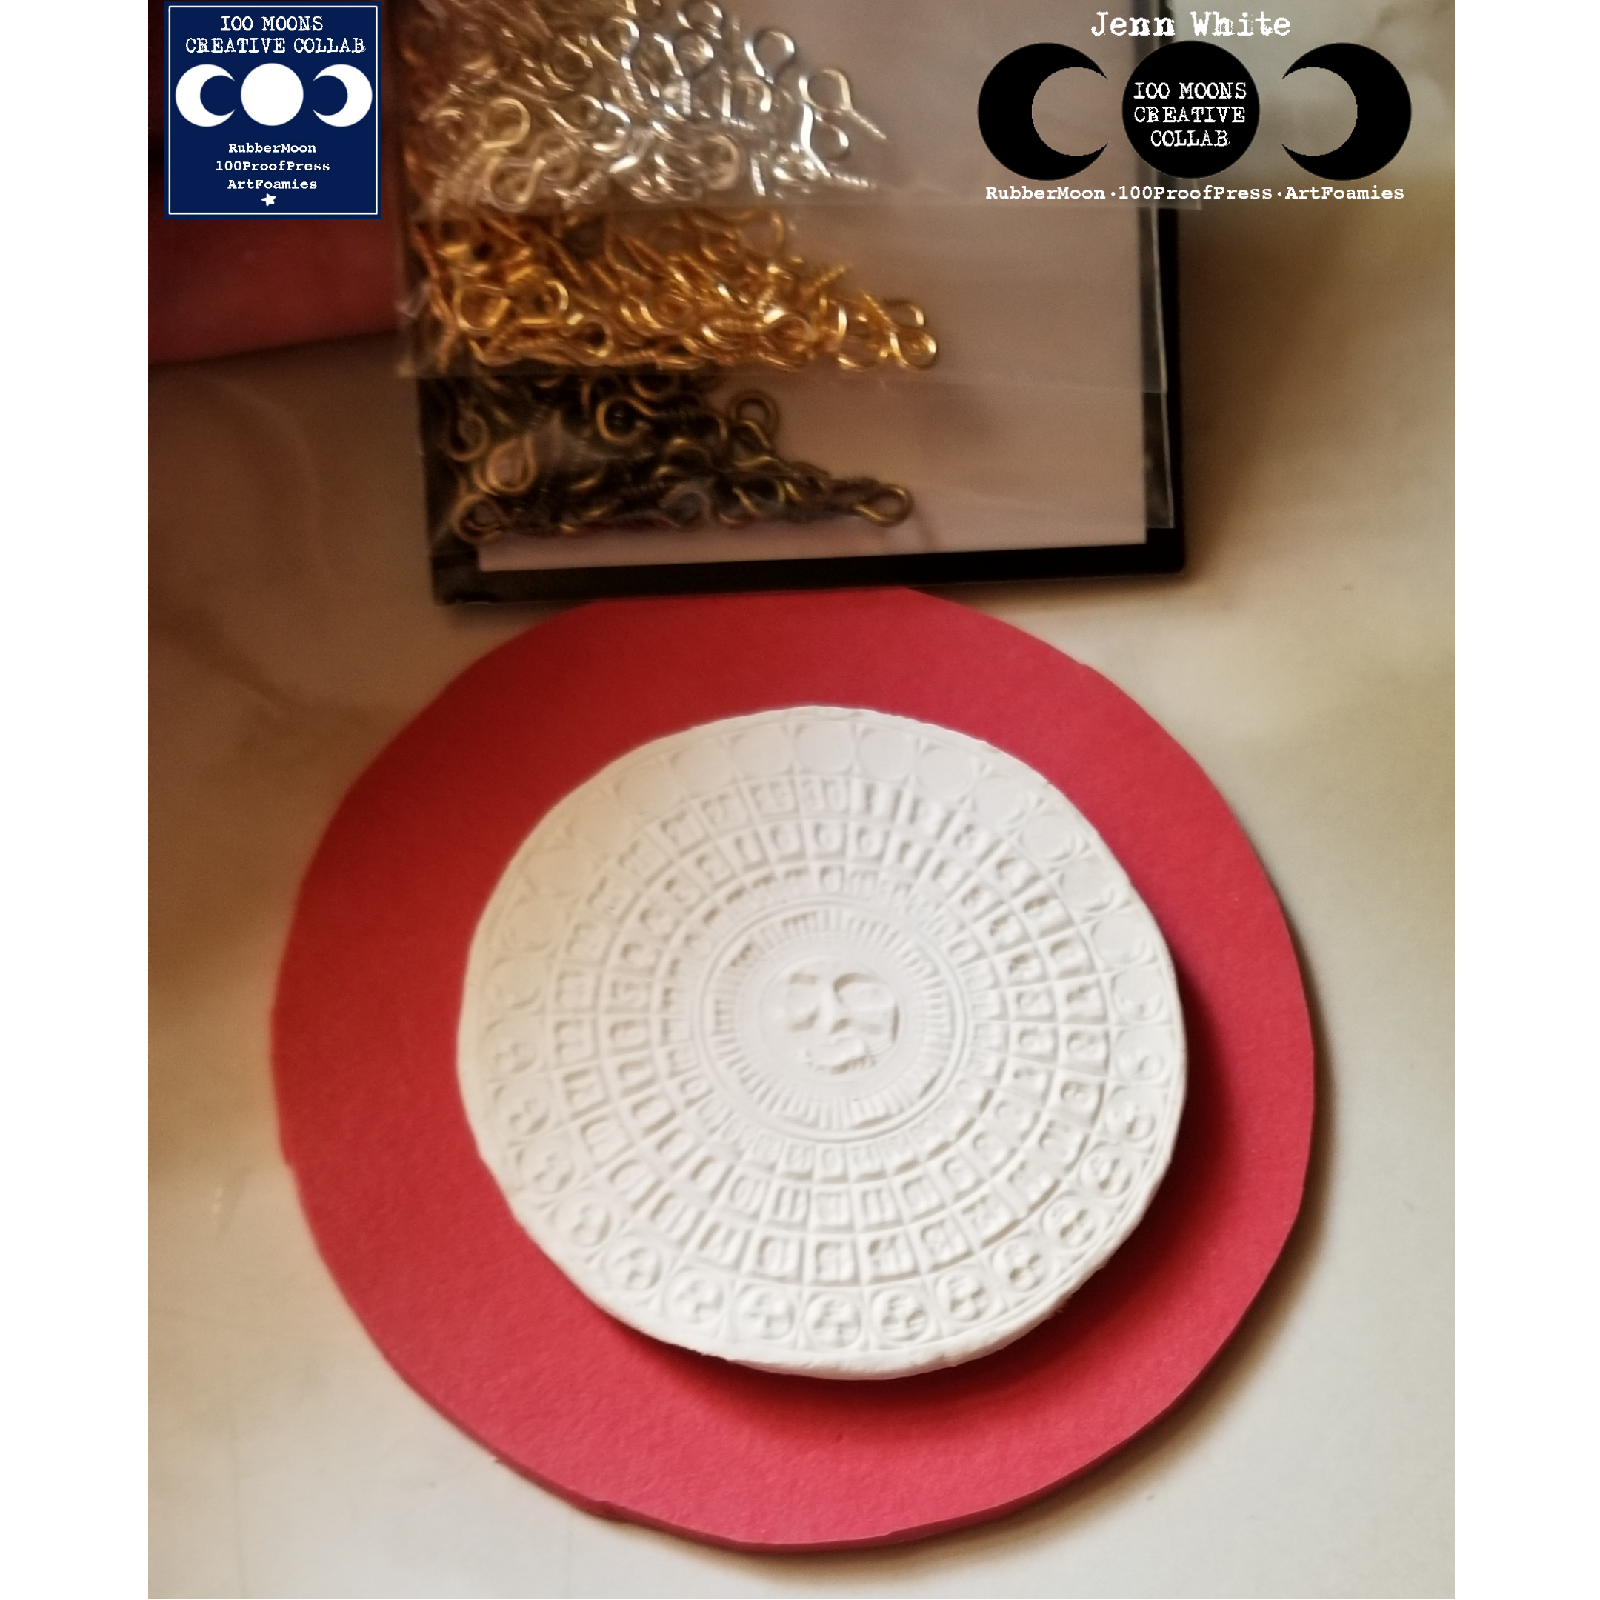
☆Jewelry eye screws in your choice of metallic tones.
I used a multi metallic toned variety pack I found in the Jewelry Shoppe brand.
☆A fingernail sanding block, Emery board or metal file. Just in case you need to smooth a rough edge you missed after the clay dries. (Not manditory.)
☆Acrylic paints in your favorite colors.
I used Golden heavy body Iridescent Bright Gold & Golden heavy body Ultramarine.
☆Moonlight Duo ink refills
https://rubbermoon.com/products/pre-order-moonlight-duo-reinkers?_pos=7&_sid=32271cce9&_ss=r
I chose Deep Space Blue, Bright Sky Blue, Lunar White & Eclipse Black.
☆Moonlight Duo Ink Pads in Bright Sky Blue & Deep Space Blue.
https://rubbermoon.com/products/moonlight-duo-ink-pads-assorted-colors?_pos=6&_sid=224122620&_ss=r&variant=6060434423835
☆Professional Super Glue (OPTIONAL)
☆Aerosol can spray sealant
(OPTIONAL)
☆Ribbons, cording, wire or monofilament if you wish to hang or wear your creation.
☆Embellishments such as gems, sequins, crystals, beads, charms & trims are optional to give your creation that added touch.
☆It is also quite handy to have an Apron, gloves (if you have hypersensitive skin), paper towels, wet wipes, waxed paper & paper plates on hand for this project.
☆STEP 2☆
Open up your package of clay & pull out enough clay to make a good sized ball in the palm of your hand.
Knead it into a circular shape keeping in mind it needs to be at least an even quarter inch in thickness or more after you roll it smooth with your rolling pin.
Lay the circle of kneaded clay on a smooth, clean, dry surface.
Roll the clay out to form a smooth & even surface with your rolling pin.
I spin, flip & fold the clay over as I roll it out. Similar to rolling out homemade biscuit or cookie cutter cookie dough.


REMEMBER, it needs to be at least an EVEN consistant quarter inch thickness or more so you have enough room to insert the tiny eye screws to hang it as a pendant or ornament.
☆STEP 3☆
Make a visible mark on the back or outside edge of each of the stamps with a permanent ink pen or marker so you will know where the top center of the rubber stamp is.
This will be very useful in lining them up & knowing where your top center is when the clay is sandwiched between them


Push your 1st chosen unmounted circular shaped rubber stamp down into the clay using firm even pressure.
Take care not to be too forceful or you will distort the image in the clay & you'll need to start over by kneading it & beginning again.
Lightly with even pressure roll your rolling pin over the back of the stamp one time.

☆DO NOT LIFT THE STAMP OFF OF THE CLAY YET! LEAVE IT THERE!
SLOWLY & GENTLY peel the clay up from your base surface WITH THE STAMP STILL ATTACHED TO IT.
Take care not to stretch the clay or mark into the clay with your fingernails. IF you have markings you wish to smooth use your water dampened fingers or a wet wipe to smooth them.

☆STEP 4☆
Trim the excess clay off from around the stamp as close as you can to the edge using your long shank scissors with your dominant hand while holding the stamp that is impressed into the clay in your other hand.


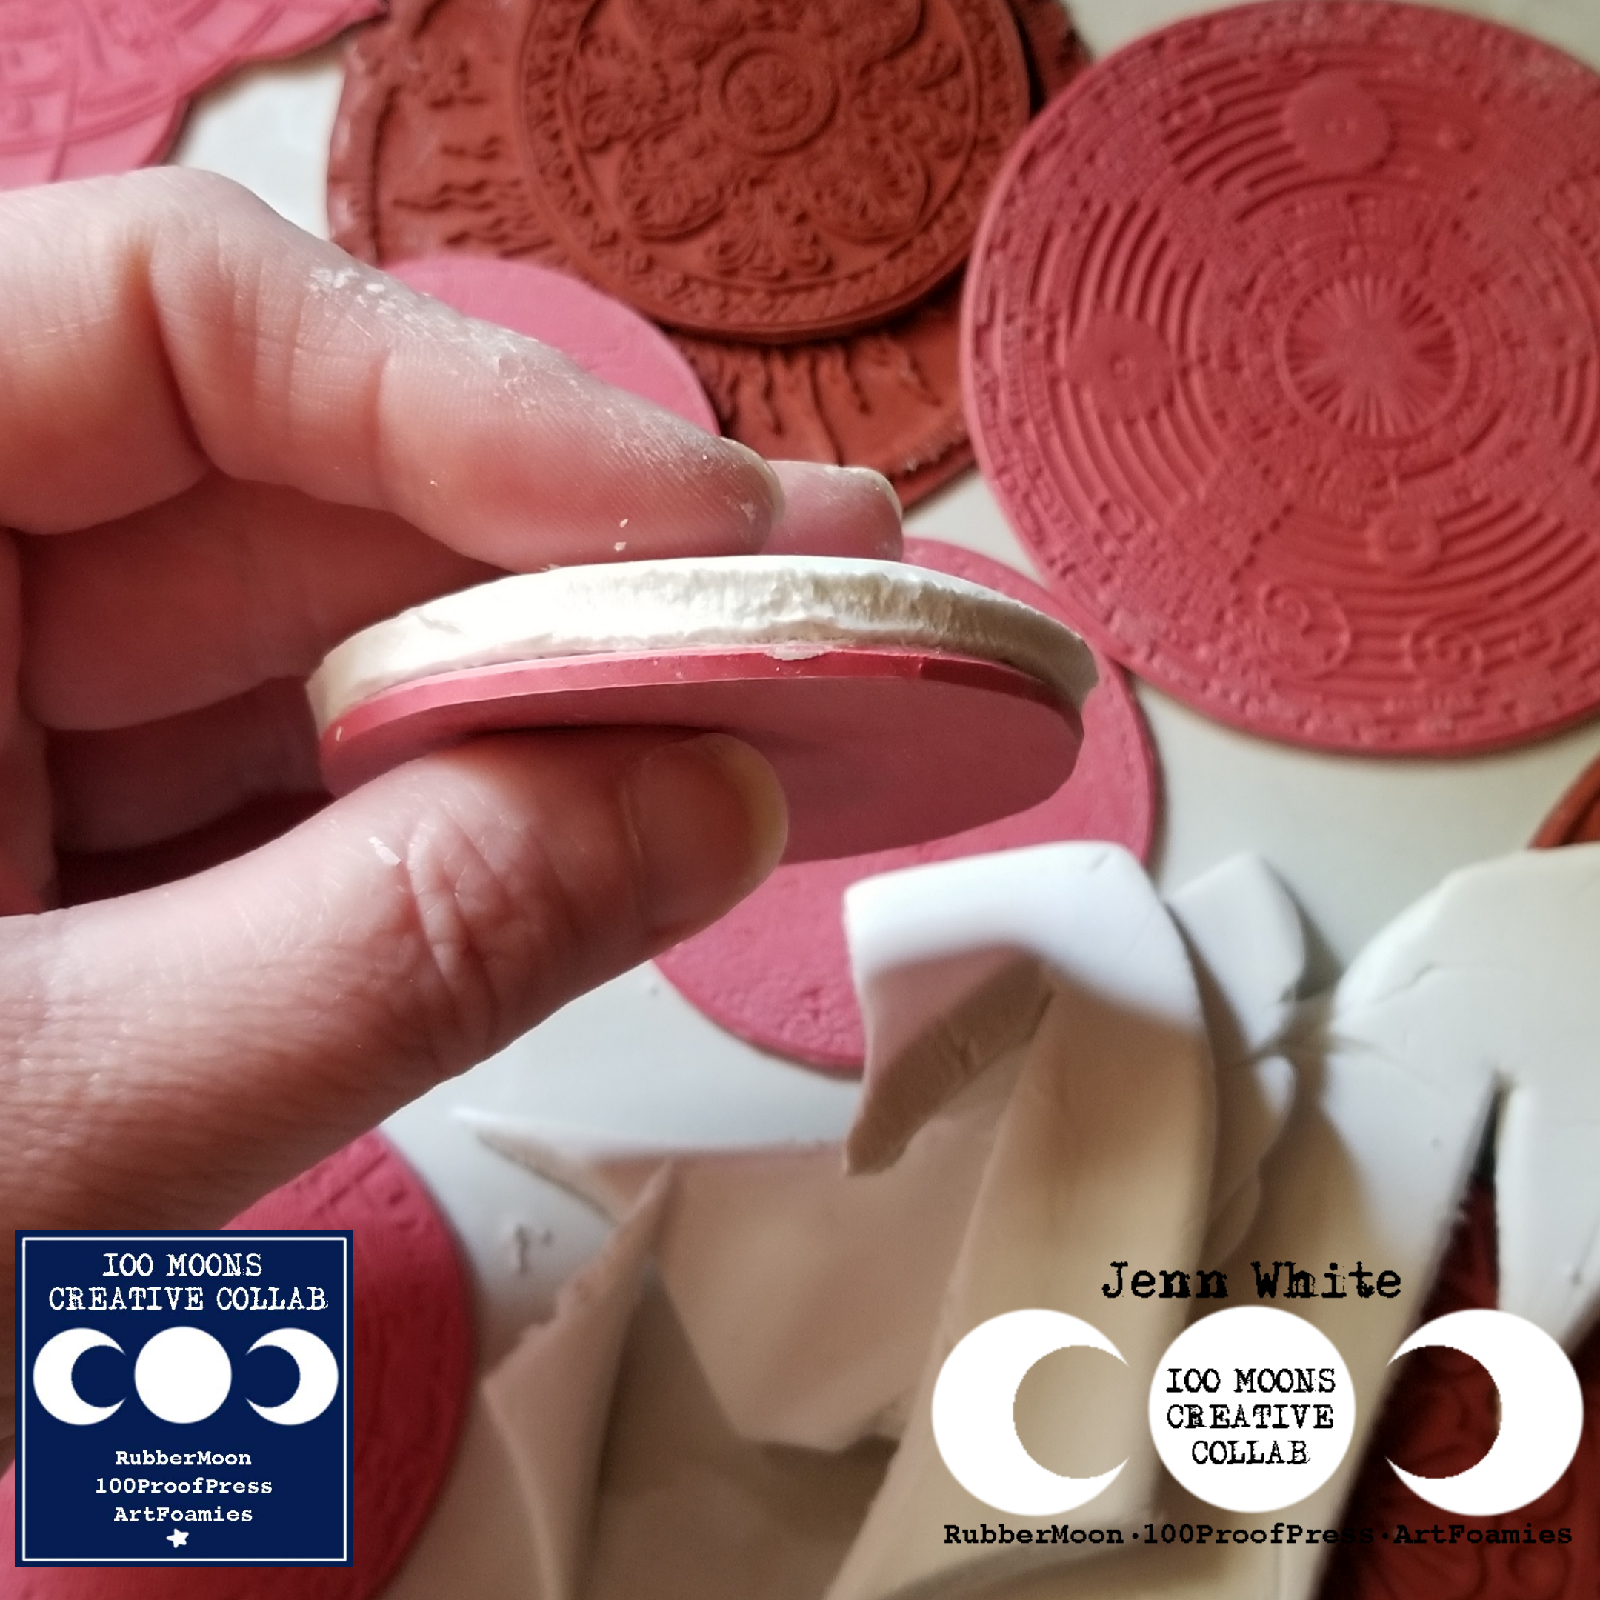
Put these trimmed off clay remnants in a sealed slider bag to keep them fresh & pliable to use on your next creation.

☆STEP 5☆
Lightly dampen your fingers with water & run them around the rough edge of the freshly cut clay to smooth it.

☆STEP 6☆
Get your other unmounted rubber stamp of the same size & line it up with this rubber stamp using the marks you made to guide you where the top center is.

Make a clay sandwich by applying the second rubber stamp to the clay too.
Lightly & evenly press the stamp into the sandwiched clay using a circular spinning motion with your fingertips.
Smooth the edges of your sandwiched clay again with you dampened fingertips.

Lay it back down on the counter or table & give the second stamp a light & even roll with the rolling pin to make sure it gets evenly impressed.
Feel free to smooth the rim edge with water again if need be.
If you have made the clay squeeze out the sides by applying too much pressure or if your piece has become too thin you might want to start over & try again. It's okay. I sometimes have to do many do overs. Practice practice practice.
☆STEP 7☆
It's time to remove your unmounted rubber stamps from the clay.
SLOWLY & CAREFULLY peel back the rubber stamps from the clay.


Take care not to make indentions in the clay with your fingernails.
If you do make indentions, you may be able to smooth them with the water dampened pads of your fingertips.
Grasping only the edges lightly with the pads of your fingertips, place the impressed clay piece on a smooth, clean, dry surface.


☆STEP 8☆
At this time you need to insert your tiny eye screws into the clay if you wish to wear it as a pendant, hang it as an ornament or have embelishments dangling from it later.
Carefully center the tiny eye screws & gently push them straight into the edge of the clay piece taking care not to wiggle them around & or push them through to the outer designs damaging them. If this damage happens, you will probably need to start over. If it just wiggled around too much you can glue the eye screw in later after the piece has had it's drying time. Do not worry. It's okay, take your time & breathe. It's supposed to be a fun learning experience. I have created these nearly every week for the past 3 years & I still make mistakes.


As the piece dries & cures over the next 24 to 48 hours it will experience a bit of shrinkage which will set the tiny eye screws tightly & securely into the clay. If your eyescrews are loose after the drying time you can easily set them in securely with some professional super glue.
Set your piece aside in a safe place to dry on a non stick surface for the required drying time stated on your clay product packaging where it will not be touched or damaged. Trust me on this. Stuff gets dropped spilled splashed & falls over onto these while they are drying. Never fails at my house. Move them to a safe place where they will not be bothered for a couple of days. I usually set them close to or on my dehumidifier machine.
☆Step 9☆
After your piece has fully dried, you need to decide if you want to leave it as is or paint or ink it.
FIRST, check your piece over to see if there are any areas you wish to smooth with a fine sanding block or Emery board.
Keep in mind the color you use for your first coat will show up in all of the deeper impressed details of the rubber stamp image you chose to use.
You need to decide if you wish them to be light, dark or metallic in color under the top coat that will be on the raised areas of your piece.
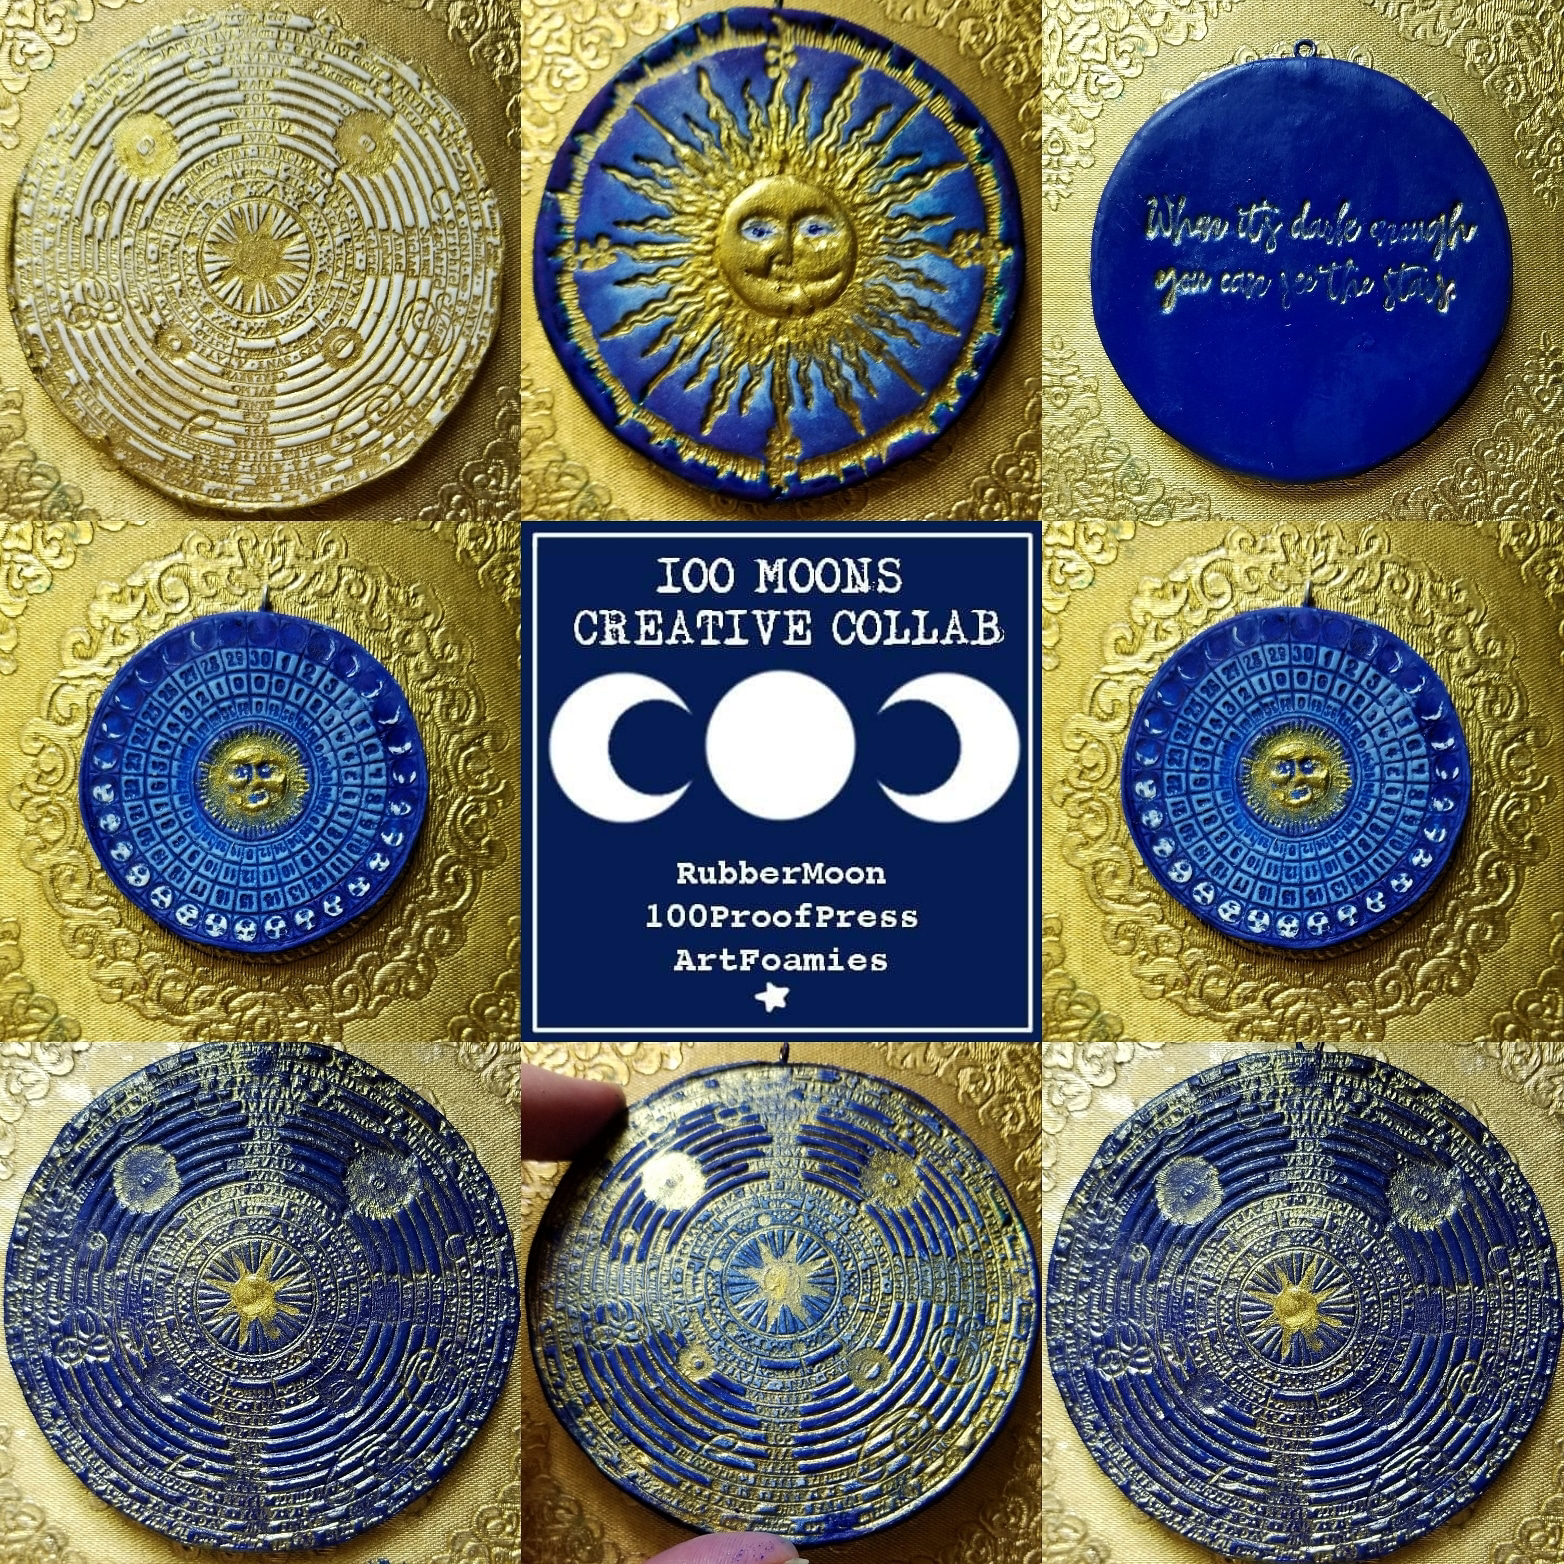
On my Zodiac & Sun 2 sided medallions, I chose to use GOLDEN HEAVY BODY ACRYLIC PAINT IN BRIGHT IRIDESCENT GOLD first to accentuate the DEEPER fine impressioned details, lines designs & words.
I covered the entire piece front & back with the GOLD metallic paint making sure to really get the paint down into every crevice, nook & cranny & thoroughly inspected the piece to make sure none of the white clay was showing anywhere.

I then took a wet wipe & very lightly wiped off paint from the raised areas of the piece until they were blank & white again.

☆PRO TIP☆
DO NOT wipe your piece down so aggressively that you remove the paint from the deep details. You can leave it just like this if you like it.
If you want to add the blue make sure you let the piece dry for a bit before beginning the next step.
On the Moon Phases pendant /medallion I only put the gold metallic acrylic paint where the center sun is & in the wording & mandala stamp on the back side of this pendant.
You can do the whole thing if you wish to make it look like a gold coin. I liked it this way better.

See how I added the LUNAR WHITE Moonlight Duo Ink to each of the moon phases on the pendant?
I also used DEEP SPACE BLUE & BRIGHT SKY BLUE Moonlight Duo Inks on this pendant.

It is so simple to paint on the ink refill ink then use a wet wipe to wipe it off of the raised areas until you achieve your desired look.
☆PRO TIP☆
TOO MUCH AGGRESSIVE WET RUBBING WILL CAUSE YOUR STAMPED IMPRESSIONS TO DISAPPEAR. GO EASY & LIGHTLY.

☆PRO TIP☆
LET IT HAVE SOME DRYING TIME BEFORE BEGINNING TO ADD MORE COLOR

I filled in the moon shadows with a fine detail paint brush using RUBBERMOON MOONLIGHT DUO INK REFILL in DEEP SPACE BLUE.

I painted the raised areas of the sun with Golden Heavy Body Acrylic Paint in BRIGHT IRIDESCENT GOLD.

I painted the back of the pendant Mandala stamped image with Golden Heavy Body Acrylic paint in
BRIGHT IRIDESCENT GOLD.

After the gold acrylic paint dried it was time add some blues.
To achieve the blue on the raised areas I first lightly skimmed the BRIGHT SKY BLUE MOONLIGHT DUO INK PAD over the ornament.
Next I lightly skimmed the DEEP SPACE BLUE MOONLIGHT DUO INK PAD over the outside edges & rim of the ornament. I set it aside to dry.
On the back of the ornament I used the same process as the front side.

The only thing I did different on this side was paint over the sun with GOLDEN HEAVY BODY ACRYLIC PAINT IN BRIGHT IRIDESCENT GOLD after the MOONLIGHT DUO INKS had dried.
I added a bit of LUNAR WHITE MOONLIGHT DUO REFILL INK around the eyes of the sun to accentuate them after the gold acrylic paint had dried.
I added BRIGHT SKY BLUE MOONLIGHT DUO INK REFILL INK pupils to the eyes of the sun.
I rubbed the BRIGHT SKY BLUE INKED raised areas closest to the sun with a wet wipe to create a glowing effect.
☆STEP 10☆
OPTIONAL
To protect & seal your pieces you may choose to spray them with an aerosol spray sealant.
Thank you for joining me today & for your time. I hope you are inspired to try this tutorial too & share your personal creations with me & all of us if you wish so we can all be inspired by your creativity too! Thank you for your love & kind comments.
They are very appreciated!
HUGS! YOU ARE LOVED!
- Jenn White
I am impressed, fascinated, and inspired by this very detailed tutorial. How I love one that is written with illustrations, so much easier to follow than YouTube videos.Thank you so much! Beautiful work!
Oh My . WOW. Very impressive and informative. Wondered though before the clay dries you could probably alternatley poke/punch a hole in center top instead of putting in eye screw. I guess that is totally up to whoever is making them. Though that might take away from some of the design. Regardless, very cool.